Building My House

I have always wanted to build my own house. I am retired now, so I have the time. I found some land, designed a house that would fit the land and my needs and got started. I am doing all the work myself, so progress will be fairly slow. To read this blog from the beginning, start with the oldest archive and read posts from last to first.

Saturday, July 08, 2006

Finally, Some Real Digging


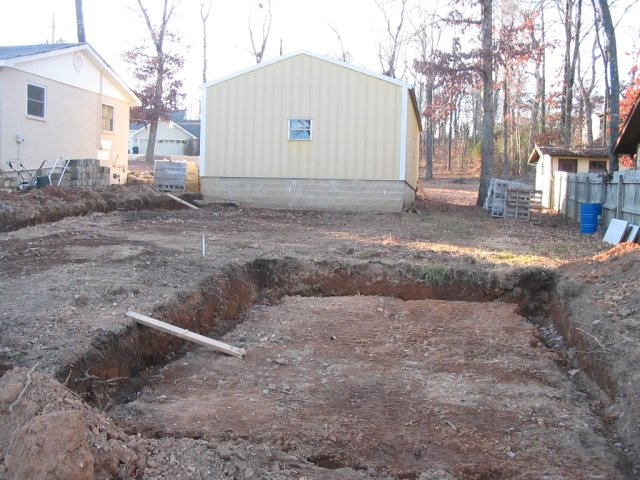
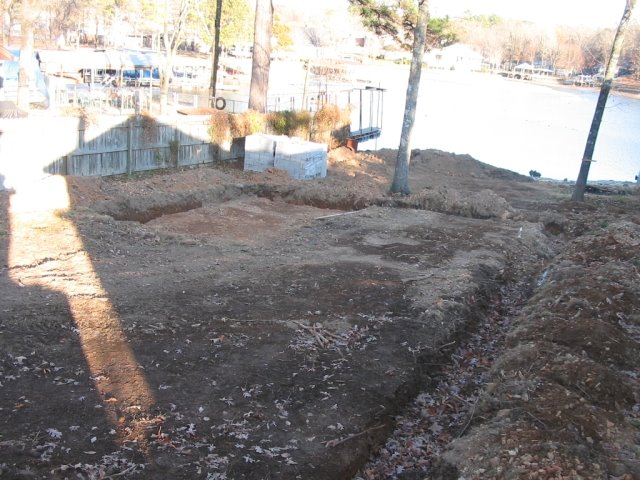
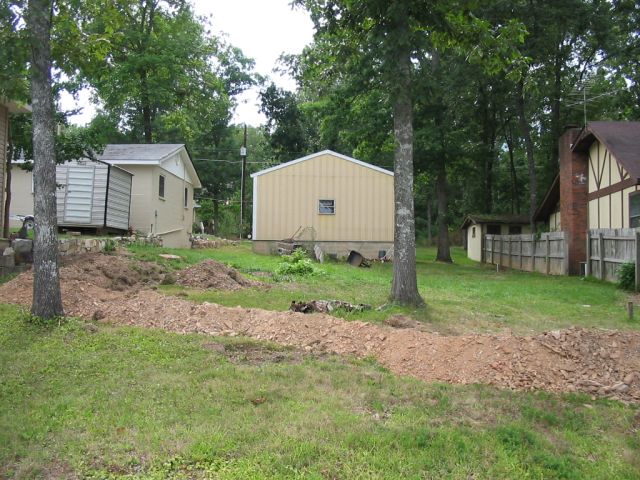
Now that we've solved all the sewerline problems, we can finally get started with some real foundation digging. Top pic is looking west from the lake; bottom pic is looking mostly east from the corner of the workshop. There are 15 pallets of concrete block sitting all over everywhere; bought when they were on-sale. Frost depth around here is only 2-3 inches, so the footers don't have to go very deep. As the trenches go down to the "shale" layer I'm planning on 8" tall by roughly 16" wide footers; reinforced with three pieces of rebar set about 3" off bottom. The deep hole in both pics is my basement room to be; a 12 x 22 room, and part of the crawlspace. As the house will actually connect to the workshop, floor level will be same as garage (bottom of yellow metal siding). This yields a usable ceiling height of almost 80 inches in the basement room (to the bottom of floor joists).

It seems everything in housebuilding takes longer, is more expensive and is more complicated than originally estimated. In this case my backhoe operator had a very busy schedule, so it took him almost a month to get all this dug. One time he had a hydraulic hose break while digging for me. That shut us down for awhile.

You will notice all the footer's haven't been dug yet. The dig has to be a two stage process so the concrete truck can get in to pour the first footers.

One of Life's Little Detours


My daughter and I are kindred spirits; we both love doing new and exciting things. So, when I got an email from a workmate at my last job (before retirement) asking me if I was interested in going skydiving...the answer was obvious. And when I asked my daughter if she wanted to go...again, same obvious answer.

So 14 of us showed up at Skydive Houston (Texas) one Saturday morning. When we arrived at 8am there were already at least 50 people there; and all of them jumping from the same airplane (some days it takes 12-15 plane loads to get everybody airborne). The plane is a Dehavilland Twin Otter and can carry about 10-12 passengers (depending on weight).

We jumped tandem (two people in one chute) from about 14,000 feet. Ground temperature was 95 degrees; air temp on leaving the plane was 32; chilly, but the adrenaline rush will keep you from getting cold. This altitude yields a one minute freefall, falling at about 136 mph. The freefall is very noisy, with the air rushing past you and makes really big dimples in your cheeks. You would never hear your instructor talk, so all signals are given by hand taps to shoulders, waist, etc. About the only signal given is just before chute opening; when the instructor wants you to cross your arms over your chest so you don't punch him out. At 4000' the instructor opens the chute and in just a blink your feet swing thru from a belly down freefall position to an almost upside down position. But, one second later you swing back down into a normal almost vertical position. Then things get a lot quieter as you descend for about 5 minutes to the ground. The instructor let me steer the chute some. Turns are easy; just pull the riser in the direction you want to go.

Landings are easy; you just put your feet out (shown in pic) and slide in, first on your feet, then sit down and slide on your butt. You end up sitting on top of the instructor.

We had a video made of each of us. It still gives me goosebumps everytime I watch it.

Now, back to housebuilding.

Digging Begins -- Well, Kinda, Sorta


Okay, so now we're up to September, 2005. My lot plat drawing (the one I got when I bought the property) shows two 4" sewerlines run across the backside of my property to the "back" manhole shown in previous picture. They shouldn't interfere with my house building. Unfortunately, the sewerlines didn't actually run where the plat showed them. Yes, you guessed it, they run right under where my living room will be. Somebody elses sewer running under your house is a no-no for the city, so they will have to be moved.

So, yes digging has started, but not the digging of the footers.


The ditch dug in this pic puts the sewers back to where they were shown in the original plat drawing. The city was nice enough to draw up a new plat drawing for me (for free) and file it with the county (also for free).

I know what you're thinking (cause I thought it too). That being, since the sewer wasn't where the city said it was; that I wouldn't be responsible (financially) for moving it. Wrong thinking oh wise one. There is a little law (put there for this very purpose) that says wherever a sewer runs, an easement is automatically attached to it, whether it is platted correctly or not. And, here's the good part, once you "know" about it (the easement), you can't knowingly build on it. So, if I hadn't taken the time and effort to confirm the sewer locations I wouldn't have "known" about it and COULD have built over it. Or, at least when the city finally did discover where it really was, then maybe they would have paid or at least help pay to move the two sewer lines. I hope this makes sense. Sometimes it just doesn't pay to confirm things.

You know, they always say building a house costs more than you estimated....yepp.

Sewer Easement


There is an 8" sanitary sewer that runs down the north edge of the property (by the fence), between the two manholes shown in yellow. Attached to this sewer was a 7.5' maintenance easement (either side of centerline) which would encroach about a foot and a half into my house to be. I talked to the city; they said we could change it to a 5' easement. Unfortunately, getting it changed took most of a year. At times I thought it just wasn't going to happen; which would either be the end of the project; or at the least require a significant design change. But, in the end, and with a lot of patience and persistance it was finally done. So, now we can start digging.

After Trees Removed


Here is a site view from the lake done the following summer and after three of the walnut trees were removed. The tree on the far left still has to be removed. On the right stacked up is all the big pieces of the first three trees. After the fourth tree came down, we cut up and split all that walnut; got over 2 full chords from it; and then sold it to one of the local barbecue restaurants for enough money to buy my chainsaw, splitting maul and a splitting wedge or two and a nice gift for my girlfriend who split probably a whole chord of that walnut by herself.

Note to self: Never let a woman who can swing a splitting maul get angry at you, especially if she is holding said maul.

You can also see a better view of the workshop, as well as the narrow site access to the right of the yellow workshop. This narrow access will come heavily into play when the footers are poured.

Construction Site


Here is what the construction site looked like back in late 2004, when this project started. It is a narrow lot about 50 wide by 200 long with 50' of lakefront footage (Lake Hamilton). They normally lower the lake in winter so people can work on boat docks, seawalls and to help kill the algae that grows in the lake.

The four big trees will have to be removed as right now they are all in my future living room.

Also notice the yellow metal building. That is my 22 x 40 garage/workshop; already built when this project started.

Thursday, July 06, 2006

Okay, so where do we start. I'm new to blogging, so bear with me as I try to get past the newbie stage.

First, some info about the house to be. I'm building a 3 bedroom, 2 bath, single story home over a crawlspace. The main floor will have about 1700 sq feet with outside dimensions of 30 wide by 57 long. As the lot slopes down about 7 feet from the home's west to east end there will be a roughly 12' by 22' basement room in the lowest corner.

This house will utilize as many energy efficiency techniques in design and construction as I can afford. I have been researching these ideas for a year from many different sources. A lot of the information came from the website BuildingScience.com. I bought and read one of their books "Builder's Guide to Mixed Climates". Lots of what I am designing into this house came from that book. I strongly recommend that book to anyone building in this mixed-humid climate region (which starts in and includes most of north Texas, Oklahoma, Arkansas, northern halves of Louisiana, Mississippi, Alabama, Georgia, and pretty much all of Tennessee, Kentucky, Virginia, North and South Carolina. Technically defined as the "mixed-humid" region it is a particularly difficult region to build in because it has plenty of rainfall, a fair amount of cold weather and lots of humidity in both summer and winter.

Just a few of the techniques used in this house are:
.2x6 exterior walls on 24" spacing.
.stack framing - where roof trusses will sit directly on top of wall studs, which sit directly on top of floor joists. This creates a continuous load path all the way to the ground.
.a sealed crawlspace - read that as unvented. The crawlspace will be my hvac return. Each room will have a supply duct AND a return. All returns go into the crawlspace. So, the crawlspace will be conditioned (heated and cooled) air.

I don't want this post to get too long, so I'll stop now.