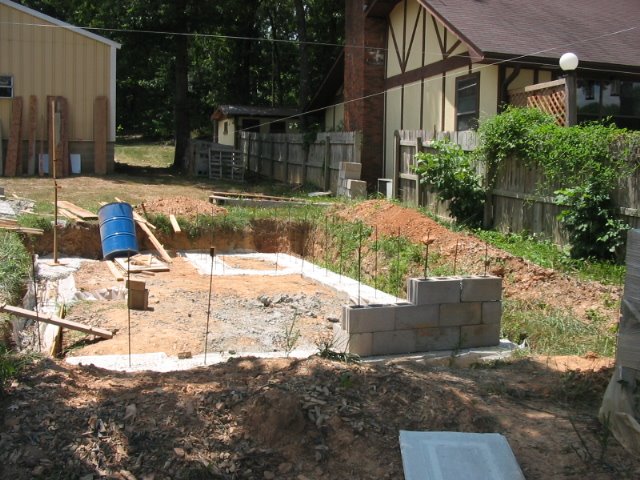
Building My House

I have always wanted to build my own house. I am retired now, so I have the time. I found some land, designed a house that would fit the land and my needs and got started. I am doing all the work myself, so progress will be fairly slow. To read this blog from the beginning, start with the oldest archive and read posts from last to first.

Wednesday, July 12, 2006

Rebar Safety


Imagine for a moment, that you are working on your dream house -- alone -- everybody else is at work, and none of the neighbors are at home. You're carrying something, you trip on a loose rock, fall, and skewer yourself on one of these many vertical rebars. Not a pretty picture; worse, even if you have that cell phone in your pocket and are conscious enough to call 911 you still might die before the ambulance arrives.

I found out the hard way that these cut rebar ends are very sharp; like razor sharp. They will slice you open just like a scalpel (another excellent reason for keeping the tetanus shot up to date). No, I didn't skewer myself, but I have brushed up against them a time or two and been scratched pretty good.

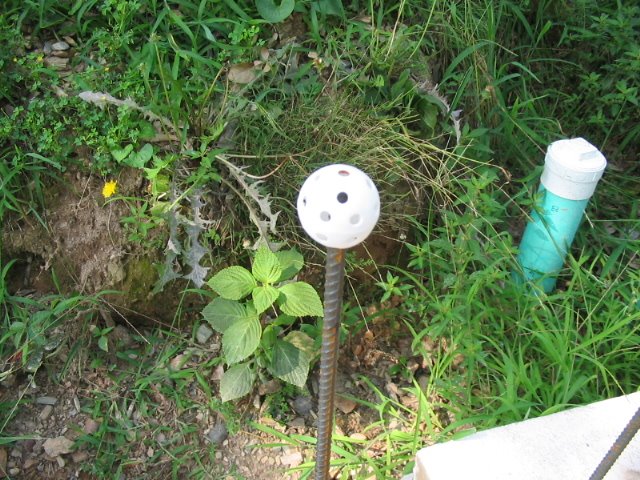
So, I decided to do something about it. First, I tried putting the plastic golf balls on top of each piece (pic #3). That works well to prevent scratches, but it wouldn't prevent the skewering fall. So, then came the 2x2 wooden blocks, drilled halfway thru lengthwise with a 1/2" spade bit. Now, these things work. I've put my weight down on them and they hold me up. If you fall on one, it will hurt like the dickens, but it might prevent an untimely trip to the morgue.

Build safe guys.

Monday, July 10, 2006

Finally Pouring Some Concrete


Okay, now with this post you the viewer are completely up to date with where I am in the construction process.

First pic is the little 3 yard concrete truck that I must get my concrete in. The narrow access to my site is too small for a standard size concrete truck (which is usually 7 or 11 yards). Thank goodness this truck exists because I am also too far away from the street to use a pumper truck. So, without it I'd have to either wheelbarrow the concrete to the site, or rent a backhoe and use the bucket on front (neither of which would be very appealing.)

Second pic - We poured the south footers first. The pour went very well. The driver even had time to take a hand float and smooth off the tops of the footers for me.

Third pic - is after putting in the vertical rebar every 23 inches. I had to erect a frame that would hold the rebar straight up and in the right place while the concrete cured. In this pic the diagonal cross arms have been layed down (in pic 2 they are up and out of the way while concrete was being poured). The horizontal boards that the rebar attaches too are also now in place. There is a screw in each horizontal board every 23 inches. This tells me where to put the vertical rebar AND it provides something for me to zip-tie the rebar too.

Fourth pic - This is the completed east wall footer which was part of concrete pour number two. The east footer was formed up exactly like the south wall footer was done, so no need to repeat photos here.

Fifth pic - The basement footers (well part of them). In the foreground will be a door (just to the left of the stacked up block). The block stack is a little test to see how well the 23" rebar spacing fits in the block. In the back right corner are the footers for the basement tornado shelter. The left side footers haven't been poured yet as the truck can only deliver 3 yards of concrete at a time, and I can at best only get one load of concrete a day. That's okay for me, because trying to pour, finish and install vertical rebar in 3 yards of concrete is about all one person can do in a day.

The Rebar Adventure


So, now it's time to start cutting and bending rebar. A couple of weeks earlier one of the local stores had a 15% off sale on everything; so I bought all 200 pieces of my rebar (10' lengths). My original rebar estimate was for about 184 pieces, and it seems I've heard regularly that you should plan on 10% waste; so 200 pieces seemed about right. For those of you with building experience, you're probably thinking even 184 pieces is WAY too many. But remember, this is a dry stack project, so there is a LOT of rebar that runs vertically inside the concrete block.

So, I rent a rebar cutter-bender, which is this big hundred pound jaw-like thing that has a 6' steel bar you pull on to cut or bend the rebar (before it's over you'll wish that bar was 8' long). I picked it up at 4:30 pm and still having a few hours of daylight left thought I'd get a head start on the job. I'll bet I cut 50 pieces of rebar before supper that night. Good thing I did, because the next day I used every bit of my remaining time to get the job finished.

A little side note here for those of you wanting to build your own house. We have maybe five or six tool rental businesses here. Only two of them even had a rebar cutter-bender. But the rental rates for the two stores were drastically different; ie $16 a day vs $40 a day. I rechecked after hearing both prices; they were for the same type and size equipment. And, the cheaper store was kind enough to put in a new set of cutter blades when I rented it from them. So, take the time to shop around; you can save yourself some bucks. These people are also nice enough that if you need to just cut or bend a couple of pieces of rebar you don't have to rent the machine for a whole day; they will let you use it at their shop; just bring your own rebar.

The two pics are the south wall. You can see the double set of form boards in the bottom picture (that weren't shown in previous post). Most people don't put visqueen (plastic sheeting) under the footers, but I did. The plastic keeps water from migrating through the finished concrete via a process known as capillary flow. Most builders put visqueen under the main slab to prevent water migration. To me it seems reasonable to put it under the footer for the same reason (and my "Builder's Guide to Mixed Climates" book (by Joe Lstiburek, Taunton Press) says to do it too). Keeping my crawlspace nice and dry by getting rid of every possible entryway for moisture seems a wise and prudent thing to do. Maybe something this simple will help prevent me from having to buy and use a dehumidifier in the crawlspace.

Forming Up Footers


Here are the first footers I formed up. I could have just filled the ditch with concrete (and rebar) and put in steps where I needed an elevation change, but then installing the perimeter drain would have been almost impossible (without re-digging); so the form boards go up to leave space for the drain.

This is the south wall form-up. It is 57 feet long and has a total of five step-downs (four are visible here). Though you can't see it because of shadow, the trench to the left of these boards averages 22-24 inches wide. This would make a very nice footer being that wide, but it would also use up a LOT of concrete (expensive). So, in the end I did come back and put in a second set of form boards 16-17 inches from the ones shown. I just wish I had a picture of the double form boards.

How did I choose 16" as my desired width. One of the concrete books I read from the local library had a table that discussed footer width, concrete compressive strength and type of soil and compaction of said soil. These footers sit on the shale layer and it's a well compacted and hard. So, the book said 16" wide would be sufficient. Now, if the soil was loose, uncompacted sand; then 24" would be much better.

Sunday, July 09, 2006

Grinding Up the Stumps


Well, it had to happen sooner or later. I would find something that needed to be posted long before now -- so here's another little detour.

The construction site had not only 4 trees that needed to be removed, but also about 14 stumps that needed to go. We have this guy who comes out of Oklahoma; he comes here twice a year to grind everybody's stumps. He puts an ad in the newspaper with a phone number to call. My neighbor had used him before, so we called.

He shows up with this monstrous piece of machinery mounted on a trailer with what looks like a diesel truck engine and a grinding wheel that looks like it could cut thru concrete. Between my stumps and all the neighbors stumps in our little subdivision he did about 25 of them in about 2 hours. This thing grinds stumps so fast he doesn't even get out of the truck. Big stumps (24" diameter) take less than a minute. He drives the truck around and positions the trailer; his son or nephew (can't remember) operates the grinder.

Concrete Footer Design


So, now it's time to design the concrete footers. This project is what's known as "dry stack", which means the concrete blocks don't have mortar between them. What - you ask? What keeps the wall from moving and collapsing -- rebar, placed vertically, running thru the blocks from footer to top of wall. The rebar is anchored in the footer and for my taste will go thru most every block. To make this all fit the vertical rebar will be on 23" centers. After the wall is built, you come back and pour concrete into all the holes that have rebar in them. This locks everything together and makes for a very strong wall. Then you cover the outside and inside of the wall with about a 1/8" thick layer of surface bonding cement; which is just a fancy name for concrete mortar with fiberglass in it. After it's dry, it looks like stucco. I'm not sure if it's totally waterproof at this stage, but if not I'll make it so with something else.

Dry stack walls are a little more height critical than mortared walls, so the footers have to be at the right height, so the wall will end up the desired height. In the pic above there are five "steps" in the south wall (each stepdown is 7-5/8", same height as a concrete block). I had to make sure they were done right; so I measured, calculated, measured again, calculated again -- must have done this 3 or 4 times until I was satisfied. In the end I know exactly where (how high) to put my forms for the concrete footers. All the walls will be done this way; I just used the south wall as an example.

Another thing I wanted to add is there will be a foundation drainpipe (4" perforated PVC pipe) that runs along the bottom of each footer. For this to work the footer trench has to slope fairly evenly from the high side to the low side, so the pipe will drain well and not load up with sediment.

I know the numbers in the pic are small but numbers across the top are every 10 feet of house length; numbers down the right side are on 7-5/8" intervals. Each row of squares represents one layer of concrete block.